Editing a variable list in ASP.NET MVC

The advantage of ASP.NET MVC modelbinding is undisputed. But lately I faced a problem with a common usecase in a project for Tekaris. I´m simplifying the complexity of the project by using the following sample. Let´s say I had to display a list of products. The user should be able to add or remove items from the list (pure client logic). In the next step the user can save the list (post to the server) and the products are stored in the database. So on server side the logic compares the posted data with the persisted data, removes the not posted products and adds the new products.

The code is based on the following ViewModels.

    public class ProductViewModel
    {
        public ProductViewModel()
        {
        }

        public ProductViewModel(int id, string name, string description, double price)
        {
            ID = id;
            Name = name;
            Description = description;
            Price = price;
        }

        public int ID { get; set; }

        public String Name { get; set; }

        public string Description { get; set; }

        public double Price { get; set; }
    }

    public class ProductCollectionViewModel
    {
        public ProductCollectionViewModel() : this(new List<ProductViewModel>())
        {
        }

        public ProductCollectionViewModel(List<ProductViewModel> items)
        {
            Items = items;
        }

        public List<ProductViewModel> Items { get; set; }
    }

A simple ProductRepository class stores the data. New products are identified by the ID “0”:

    public static class ProductRepository
    {
        private static ProductCollectionViewModel _products = new ProductCollectionViewModel
        {
            Items = new System.Collections.Generic.List<ProductViewModel>
            {
                new ProductViewModel(1, "Computer", "Macbook Pro", 2000),
                new ProductViewModel(2, "Smartphone", "Google Nexus 5", 380),
                new ProductViewModel(3, "Display", "Samsung SyncMaster", 289)
            }
        };

        public static ProductCollectionViewModel Products
        {
            get { return _products; }
        }

        public static void Save(ProductCollectionViewModel products)
        {
            var maxId = _products.Items.Max(product => product.ID);
            
            products.Items.ForEach(product =>
            {
                if (product.ID == 0)
                    product.ID = ++maxId;
            });

            _products = products;
        }
    }

And here is the ProductController for listing and saving the products:

    public class ProductController : Controller
    {
        public ActionResult Index()
        {
            var model = ProductRepository.Products;
            return View(model);
        }

        [HttpPost]
        public ActionResult Save(ProductCollectionViewModel products)
        {
            ProductRepository.Save(products);
            return RedirectToAction("Index");
        }
    }

In my first approach I rendered the products using a foreach-loop. After posting the unchanged list back to the server I noticed that the returned products list was empty


@using DynamicList.Models
@model DynamicList.Models.ProductCollectionViewModel

@{ ViewBag.Title = "Products"; }

@using (Html.BeginForm("Save", "Product", FormMethod.Post))
{
    <div class="row">
        <div class="col-md-8">
            <table class="table" id="productsTable">
                <tr>
                    <th style="width: 25%">Name</th>
                    <th style="width: 40%">Description</th>
                    <th style="width: 15%">Price</th>
                </tr>
                @foreach (ProductViewModel product in Model.Items)
                {
                    <tr>
                        <td>
                            @Html.HiddenFor(m => product.ID)
                            @Html.EditorFor(m => product.Name, new { htmlAttributes = new { @class = "form-control", placeholder = "Name" } })
                        </td>
                        <td>@Html.EditorFor(m => product.Description, new { htmlAttributes = new { @class = "form-control", placeholder = "Description" } })</td>
                        <td>@Html.EditorFor(m => product.Price, new { htmlAttributes = new { @class = "form-control", placeholder = "Price" } })</td>
                    </tr>
                }
            </table>
        </div>
    </div>
    <div class="row">
        <div class="col-md-8">
            <input type="submit" value="Save" class="btn btn-primary" />
        </div>
    </div>
}

variablelist_empty_postbackAfter some investigation I found out that I had to use a for-loop. Accessing each product based on its index changes the way each element gets rendered. Every element is getting a “path” in the name attribute as you can see in the following snippet (based on the foreach-loop)

variablelist_name_attribute_without_index

That enables the ModelBinder to map the posted data back to the appropriate property of the model. But that´s not working with a collection. So I used a for-loop and the data was returned correctly:

@model DynamicList.Models.ProductCollectionViewModel

@{ ViewBag.Title = "Products"; }

@using (Html.BeginForm("Save", "Product", FormMethod.Post))
{
    <div class="row">
        <div class="col-md-8">
            <table class="table" id="productsTable">
                <tr>
                    <th style="width: 25%">Name</th>
                    <th style="width: 40%">Description</th>
                    <th style="width: 15%">Price</th>
                    <th></th>
                </tr>
                @for (var i = 0; i < Model.Items.Count; i++)
                {
                    <tr>
                        <td>
                            @Html.HiddenFor(m => Model.Items[i].ID)
                            @Html.EditorFor(m => Model.Items[i].Name, new { htmlAttributes = new { @class = "form-control", placeholder = "Name" } })
                        </td>
                        <td>@Html.EditorFor(m => Model.Items[i].Description, new { htmlAttributes = new { @class = "form-control", placeholder = "Description" } })</td>
                        <td>@Html.EditorFor(m => Model.Items[i].Price, new { htmlAttributes = new { @class = "form-control", placeholder = "Price" } })</td>
                        <td><button class="btn btn-danger delete-link pull-right">Remove</button></td>
                    </tr>
                }
            </table>
        </div>
    </div>
    <div class="row">
        <div class="col-md-8">
            <button class="btn btn-primary pull-right" id="btnAddProduct"><span class="glyphicon glyphicon-plus"></span> Add product</button>
            <input type="submit" value="Save" class="btn btn-primary" />
        </div>
    </div>
}

variablelist_correct_postback

The name attribute now contains the index of the item in the list of the products.

variablelist_name_attribute_with_index

The next step was to add some JavaScript logic for removing and adding products. In my case I removed the tr-element when removing a product. In order to add a product I created the necessary HTML and added it to the table. And now a requirement of the DefaultModelBinder takes place.

The index in the name attribute must be sequential

Well, that´s not the case when I remove a product which is “between” others. So for example the sequence 0-1-2-3 would change to 0-1-3 after removing the product on index 2. So the product with the index “3” wouldn´t be mapped. It seems that previous versions of the DefaultModelBinder allowed non-sequential indexes. But in ASP.NET MVC 5 it´s definetely not the case.

I decided to write some logic that recreates the index after adding or removing a product by updating every element that contains the appropriate name attribute.

This is the final /Products/Index.cshtml page. It contains a delete and an add button as well as two click handler.

  • The first one removes the appropriate table row after removing a product and calls the function to update the indexes.
  • The second one adds a new product by parsing a row template and replacing the INDEX-placeholders with maximum index plus 1
@model DynamicList.Models.ProductCollectionViewModel

@{ ViewBag.Title = "Products"; }

@using (Html.BeginForm("Save", "Product", FormMethod.Post))
{
    <div class="row">
        <div class="col-md-8">
            <table class="table" id="productsTable">
                <tr>
                    <th style="width: 25%">Name</th>
                    <th style="width: 40%">Description</th>
                    <th style="width: 15%">Price</th>
                    <th></th>
                </tr>
                @for (var i = 0; i < Model.Items.Count; i++)
                {
                    <tr>
                        <td>
                            @Html.HiddenFor(m => Model.Items[i].ID)
                            @Html.EditorFor(m => Model.Items[i].Name, new { htmlAttributes = new { @class = "form-control", placeholder = "Name" } })
                        </td>
                        <td>@Html.EditorFor(m => Model.Items[i].Description, new { htmlAttributes = new { @class = "form-control", placeholder = "Description" } })</td>
                        <td>@Html.EditorFor(m => Model.Items[i].Price, new { htmlAttributes = new { @class = "form-control", placeholder = "Price" } })</td>
                        <td><button class="btn btn-danger delete-link pull-right">Remove</button></td>
                    </tr>
                }
            </table>
        </div>
    </div>
    <div class="row">
        <div class="col-md-8">
            <button class="btn btn-primary pull-right" id="btnAddProduct"><span class="glyphicon glyphicon-plus"></span> Add product</button>
            <input type="submit" value="Save" class="btn btn-primary" />
        </div>
    </div>
}

@section Scripts{
    <script type="text/javascript">
        $(document).ready(function() {
            $(document).on('click', '.delete-link', function() {
                event.preventDefault();
                var tr = $(this).closest('tr');
                
                tr.addClass("bg-danger");

                tr.fadeOut(500, function() {
                    var table = tr.closest('table');
                    tr.remove();
                    updateIndexes(table);
                });
            });

            $("#btnAddProduct").on("click", function(event) {
                event.preventDefault();
                addProductsRecord('productsTable');
            });
        });
    </script>
}

Additional content of the Site.css:

.delete-link {
    /* only a marker class */
}

The DynamicList.js contains the logic for adding a new product by parsing the rowTemplate and replacing the {INDEX} placeholders

function addProductsRecord(tableId) {
    var rowTemplate =
        '<tr>' +
            '<td>' +
            '<input data-val="true" data-val-number="The field ID must be a number." data-val-required="The ID field is required." id="Items_{INDEX}__ID" name="Items[{INDEX}].ID" type="hidden" value="0">' +
            '<input class="form-control text-box single-line" id="Items_{INDEX}__Name" name="Items[{INDEX}].Name" type="text" placeholder="Name">' +
            '</td>' +
            '<td><input class="form-control text-box single-line" id="Items_{INDEX}__Description" name="Items[{INDEX}].Description" type="text" placeholder="Description"></td>' +
            '<td>' +
            '<input class="form-control text-box single-line" data-val="true" data-val-number="The field Price must be a number." data-val-required="The Price field is required." id="Items_{INDEX}__Price" name="Items[{INDEX}].Price" type="text" placeholder="Price">' +
            '</td>' +
            '<td><button class="btn btn-danger delete-link pull-right">Remove</button></td>' +
            '</tr>';

    addRecord(tableId, rowTemplate);
}

function addRecord(tableId, rowTemplate) {
    var table = $("#" + tableId);
    var newIndex = table.find("tr").length - 1;

    rowTemplate = rowTemplate.replace(/{INDEX}/g, newIndex);
    var newRow = $(rowTemplate);
    newRow.hide();

    table.append(newRow);
    newRow.addClass("bg-success");
    newRow.fadeIn(500, function () {
        newRow.removeClass("bg-success");
    });
}

// This is where the magic happens
function updateIndexes(table) {
    // get every tr element except the header
    table.find("tr:gt(0)").each(function (i, row) {
        // get every input and select elements
        $(row).find('input, select').each(function (j, input) {
            // check whether the id-attribute is of type _[index]__
            var id = input.id.match(/_\d+__/);

            // if it is an element necessary for the ModelBinder => update the name attribute
            if (id != null && id.length && id.length == 1) {
                var attr = $(input).attr("name");
                // replace the old index of the name attribute with the calculated index
                var newName = attr.replace(attr.match(/\d+/), i);
                $(input).attr("name", newName);
            }
        });
    });
}

Some other solutions with generating hidden fields or using GUIDs as index can be found in the net but nothing was really working for me. So I hope my solution can help you if you´re facing the same problem.

Easing logical OR and logical AND comparison in C#

How often have seen or written comparison code like this?

    public bool IsSupportedImage(string extension)
    {
        return (extension == "jpg" || extension == "jpeg" || extension == "png" || extension == "bmp");
    }

Every developer should answer with “yes” because logical OR and logical AND comparison is one of the basic concepts of programming. What I don´t “like” in this statement is the redundance of the parameter extension.

So I wrote some extension methods that I really use in every project at Tekaris.

    public static class ObjectExtensions
    {
        public static bool IsOneOf<T>(this T instance, params T[] these)
        {
            return these.Contains(instance);
        }

        public static bool IsOneOf<T>(this T instance, IEnumerable<T> these)
        {
            return !IsNoneOf(instance, these.ToArray());
        }

        public static bool IsNoneOf<T>(this T instance, params T[] these)
        {
            return !IsOneOf(instance, these);
        }

        public static bool IsNoneOf<T>(this T instance, IEnumerable<T> these)
        {
            return IsNoneOf(instance, these.ToArray());
        }
    }

The same comparison can be done this way:

    public bool IsSupportedImage(string extension)
    {
        return extension.IsOneOf("jpg", "jpeg", "png", "bmp");
    }

And a short example for IsNoneOf

    public static bool IsWeekday(string day)
    {
        return day.IsNoneOf("Saturday", "Sunday");
    }

Well it doesn´t make my day but it makes typing code slightly faster 🙂

Deploying a certificate into the Trusted Root store in Windows Azure Cloud Services

In a recent project at Tekaris I had to fetch data from an external webservice. The service was only accessible with a certificate. No credential based authentication was possible. So the provider sent me the required certificate which I imported to my local developer machine. Everything worked as excepected as long as it came to deployment.

The following environment is given:

  • Visual Studio 2013
  • Windows Azure Cloud Service
  • Windows Azure Worker Role

In order to deploy the certificate the following steps are necessary:

  • Upload the certificate to Azure. It has to be a .pfx  or .cer file containing the private key and all other certificates in the certificate path
  • Configure the certificates in the Worker Role project of your Cloud Service in Visual Studio

The upload of the certificate is quite simple. Connect to the Azure Poral, select your Cloud Service and switch to the Certificates tab. There you can easily upload the .pfx or .cer file. You need the password that was used when exporting the certificate. After the upload you can see all certificates within the certificate path and their thumbprint.

azure_uploaded_certs

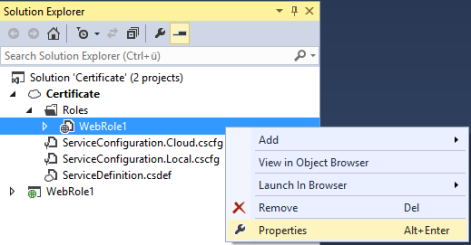
To configure which certificates are deployed to the target machine open the properties of the Worker Role in your cloud project (not of the Worker Role project itself). In the Certificates section add the required certificates. In this post I´ve described how to get the thumbprint of a certificate.

In my case I had the following certificate path:


certificate_path_3


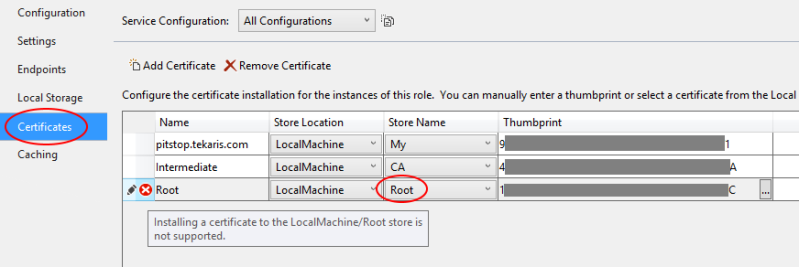
When I was configuring the certificates in the Worker Role project I was not able to set Root as the store for the root certificate. I got the following errormessage:

Installing a certificate to the LocalMachine/Root store is not supported. 

cert_root_store_not_possible

In order to get the deployment package built I had to change from Root to Trust. That meant that Azure deployed the Root Certificate into the Enterprise Trust Store on the target machine which caused a broken certificate path.

So after the deployment I connected to the target machine via RDP and moved the Root Certificate manually to the correct store. But this step would be necessary every time I deploy the package into a new environment or when the Azure Scaling framework would increase the number of machines. Not a feasible solution. That must happen automatically.

I decided to write some logic that checks on start of the Worker Role whether the certificate is in the correct store and moves it there if necessary. The following code shows only an example how to move a certificate from a defined source to a defined target store by its friendly name. My productive solution is a lot more flexible and configurable 😉

        public void EnsureCorrectRootCertificateStore()
        {
            var certificateFriendlyName = "Friendly_Name_Of_The_Certificate";

            var trustedRootAuthoritiesStore = new X509Store(StoreName.Root, StoreLocation.LocalMachine);
            trustedRootAuthoritiesStore.Open(OpenFlags.MaxAllowed);

            // Check whether the certificate is already in the correct store
            foreach (var rootCertificates in trustedRootAuthoritiesStore.Certificates)
            {
                if (rootCertificates.FriendlyName == certificateFriendlyName)
                {
                    trustedRootAuthoritiesStore.Close();
                    return;
                }
            }

            var enterpriseTrustStore = new X509Store("Trust", StoreLocation.LocalMachine);
            enterpriseTrustStore.Open(OpenFlags.MaxAllowed);

            // Search for the certificate in the "Enterprise Trust" store
            foreach (var cert in enterpriseTrustStore.Certificates)
            {
                if (cert.FriendlyName != certificateFriendlyName)
                    continue;

                // Remove it from "Enterprise Trust"
                enterpriseTrustStore.Remove(cert);

                // Add it to "Trusted Root Authorities"
                trustedRootAuthoritiesStore.Add(cert);

                trustedRootAuthoritiesStore.Close();
                break;
            }

            enterpriseTrustStore.Close();
        }

One additional thing is necessary to get the code working. The Worker Role must run in elevated mode. Otherwise the access to the Trusted Root Authorities Store would be denied.

Open the ServiceDefinition.csdef file of your Cloud project. Inside the WorkerRole section add an element with the name “Runtime” and the attribute “executionContext” with “elevated” as value. Example:

  <WorkerRole name="MyWorkerRole" vmsize="ExtraSmall">
    <Runtime executionContext="elevated">
    </Runtime>
    <Imports>
      <Import moduleName="Diagnostics" />
    </Imports>
    <ConfigurationSettings/>
    <Certificates>
      <Certificate name="my.certificate" storeLocation="LocalMachine" storeName="My" />
      <Certificate name="Intermediate" storeLocation="LocalMachine" storeName="CA" />
      <Certificate name="Root" storeLocation="LocalMachine" storeName="Trust" />
    </Certificates>
  </WorkerRole>

So that´s it. It took me some time to get all these pieces together and hopefully these lines would prevent you from having the same “nice” experience 🙂

Creating a HTML E-Mail with images from embedded resources

In my last post I described a way to create a PDF from HTML with images retrieved from embedded resources of a .NET library. Based on that I will show the necessary steps for using exactly the same images to create a HTML E-Mail. A common way I use in projects at Tekaris.

I use a similar XSLT to generate some HTML content:

<xsl:stylesheet version="1.0" xmlns:xsl="http://www.w3.org/1999/XSL/Transform"
                              xmlns:msxsl="urn:schemas-microsoft-com:xslt"
                              exclude-result-prefixes="msxsl">
  <xsl:output method="xml" indent="yes"/>

  <xsl:template match="/">
    <html>
      <head>
        <title>EmbeddedImage</title>
      </head>
      <body>
        <img src="cid:header_image" />
        <div>The image is stored as an embedded resource.</div>
      </body>
    </html>
  </xsl:template>
</xsl:stylesheet>

The src-attribute of the image tag contains a CID (MIME content ID) and references an inline attachment of the mail object with the name “header_image”. The following code shows how to add the image as inline content:

var att = new Attachment(ms, new ContentType("image/png"));
att.ContentDisposition.Inline = true;
att.ContentDisposition.DispositionType = DispositionTypeNames.Inline;
att.ContentId = "header_image";
mailMessage.Attachments.Add(att);

Here is the complete code:

string html;

using (var xsltStream = Assembly.GetExecutingAssembly().GetManifestResourceStream("EmbeddedImage.Resources.Mail.xslt"))
{
	var reader = XmlReader.Create(xsltStream);
	var xslt = new XslCompiledTransform();
	xslt.Load(reader);

	using (var ms = new MemoryStream())
	{
		xslt.Transform(new XmlDocument(), new XsltArgumentList(), ms);
		ms.Position = 0;
		using (var r = new StreamReader(ms))
		{
			html = r.ReadToEnd();
		}
	}
}

var mailMessage = new MailMessage
{
	From = new MailAddress("sender@anydomain.com"),
	Subject = "Embedded image test",
	IsBodyHtml = true,
	Body = html
};

mailMessage.To.Add("recipient@anydomain.com");

using (var ms = Assembly.GetExecutingAssembly().GetManifestResourceStream("EmbeddedImage.Resources.image.jpg"))
{
	var att = new Attachment(ms, new ContentType("image/png"));
	att.ContentDisposition.Inline = true;
	att.ContentDisposition.DispositionType = DispositionTypeNames.Inline;
	att.ContentId = "header_image";
	mailMessage.Attachments.Add(att);

	var smtp = new SmtpClient("my.mail.server");
	smtp.Send(mailMessage);
}

And the mail should look like this:

embedded_image_mail

Creating a PDF with an image in iTextSharp

This article shows how to create a PDF file containing an image in iTextSharp. It covers the following features:

  • Image is stored as an embedded resource in a .NET class library
  • Content of the PDF is created from HTML

The iTextSharp library provides a way to create a PDF from HTML. But when the PDF should contain images that are not accessible via a public URL some adjustments are necessary. To demonstrate that I decided to embed the image to a .NET class library. This is just an example. The image could also be saved on a filesystem or even be stored as a base64 encoded string in a SQL database.

To be as close as possible to the HTML specification I use the img-tag to reference the image. The HTML markup is created via a XSL transformation.

Content of the xslt:

<xsl:stylesheet version="1.0" xmlns:xsl="http://www.w3.org/1999/XSL/Transform"
                              xmlns:msxsl="urn:schemas-microsoft-com:xslt"
                              exclude-result-prefixes="msxsl">
    <xsl:output method="xml" indent="yes"/>

    <xsl:template match="/">
      <html>
        <head>
          <title></title>
        </head>
        <body>
          <div style="min-width: 1237px;max-width: 1270px;position: relative;margin: 0 auto;">
            <img src="data:imagestream/EmbeddedImage.Resources.image.jpg" />
          </div>
          <div>It´s working!!</div>
        </body>
      </html>
    </xsl:template>
</xsl:stylesheet>

The src-attribute doesn´t contain a http-Url. Instead I use the prefix data:imagestream to identify the source type of the image. After the following slash the name of the resource in the manifest of the .NET library is listed. That´s the location where differenty source types could be defined.

Now I have to teach iTextSharp a different handling for the img-tag.

This method takes the HTML content and converts it to PDF.

public Stream CreateFromHtml(string html)
{
	var stream = new MemoryStream();

	using (var doc = new Document(PageSize.A4))
	{
		using (var ms = new MemoryStream())
		{
			using (var writer = PdfWriter.GetInstance(doc, ms))
			{
				writer.CloseStream = false;
				doc.Open();

				var tagProcessors = (DefaultTagProcessorFactory)Tags.GetHtmlTagProcessorFactory();
				tagProcessors.RemoveProcessor(HTML.Tag.IMG);
				tagProcessors.AddProcessor(HTML.Tag.IMG, new CustomImageTagProcessor()); 

				var cssFiles = new CssFilesImpl();
				cssFiles.Add(XMLWorkerHelper.GetInstance().GetDefaultCSS());
				var cssResolver = new StyleAttrCSSResolver(cssFiles);

				var charset = Encoding.UTF8;
				var context = new HtmlPipelineContext(new CssAppliersImpl(new XMLWorkerFontProvider()));
				context.SetAcceptUnknown(true).AutoBookmark(true).SetTagFactory(tagProcessors);
				var htmlPipeline = new HtmlPipeline(context, new PdfWriterPipeline(doc, writer));
				var cssPipeline = new CssResolverPipeline(cssResolver, htmlPipeline);
				var worker = new XMLWorker(cssPipeline, true);
				var xmlParser = new XMLParser(true, worker, charset);

				using (var sr = new StringReader(html))
				{
					xmlParser.Parse(sr);
					doc.Close();
					ms.Position = 0;
					ms.CopyTo(stream);
					stream.Position = 0;
				}
			}
		}
	}

	return stream;
}

Here is where the magic happens. The default handling for img-tags is replaced by a custom tag processor.

var tagProcessors = (DefaultTagProcessorFactory)Tags.GetHtmlTagProcessorFactory();
tagProcessors.RemoveProcessor(HTML.Tag.IMG);
tagProcessors.AddProcessor(HTML.Tag.IMG, new CustomImageTagProcessor());

The custom tag processor only steps in with custom logic, when the src-tag starts with data:imagestream. That ensures that all other “legal” images are resolved by the logic of the default processor.

public class CustomImageTagProcessor : iTextSharp.tool.xml.html.Image
{
	public override IList<IElement> End(IWorkerContext ctx, Tag tag, IList<IElement> currentContent)
	{
		var src = String.Empty;

		if (!tag.Attributes.TryGetValue(HTML.Attribute.SRC, out src))
			return new List<IElement>(1);

		if (String.IsNullOrWhiteSpace(src))
			return new List<IElement>(1);

		if (src.StartsWith("data:imagestream/", StringComparison.InvariantCultureIgnoreCase))
		{
			var name = src.Substring(src.IndexOf("/", StringComparison.InvariantCultureIgnoreCase) + 1);

			using (var stream = Assembly.GetExecutingAssembly().GetManifestResourceStream(name))
			{
				return CreateElementList(ctx, tag, Image.GetInstance(stream));
			}
		}

		return base.End(ctx, tag, currentContent);
	}

	protected IList<IElement> CreateElementList(IWorkerContext ctx, Tag tag, Image image)
	{
		var htmlPipelineContext = GetHtmlPipelineContext(ctx);
		var result = new List<IElement>();
		var element = GetCssAppliers().Apply(new Chunk((Image) GetCssAppliers().Apply(image, tag, htmlPipelineContext), 0, 0, true), tag, htmlPipelineContext);
		result.Add(element);

		return result;
	}
}

The following sample code creates the HTML, converts it to the PDF and saves the result to a file.

class Program
{
	static void Main(string[] args)
	{
		string html;

		using (var xsltStream = Assembly.GetExecutingAssembly().GetManifestResourceStream("EmbeddedImage.Resources.Pdf.xslt"))
		{
			var reader = XmlReader.Create(xsltStream);
			var xslt = new XslCompiledTransform();
			xslt.Load(reader);

			using (var ms = new MemoryStream())
			{
				xslt.Transform(new XmlDocument(), new XsltArgumentList(), ms);
				ms.Position = 0;
				using (var r = new StreamReader(ms))
				{
					html = r.ReadToEnd();
				}
			}
		}

		var pdfService = new TextSharpPdfService();
		using (var pdf = pdfService.CreateFromHtml(html))
		{
			using (var fs = new FileStream(@"c:\temp\embeddedimage.pdf", FileMode.Create))
			{
				pdf.CopyTo(fs);
			}
		}
	}
}

And here´s the result:

embedded_image_pdf

In my next post I will show how to use the same embedded resource image as header for a HTML mail.

Invalid certificate thumbprint in Windows Azure WebRole/WorkerRole

A communication via SSL is nowadays more important than ever. Hence at Tekaris I had to secure a website hosted in a Windows Azure Webrole with a SSL certificate.

I´ll demonstrate the way I did it based on a demo project. Additionally to uploading the certificate(s) to the Windows Azure Portal you have to add the certificates thumbprints to the appropriate WebRole or WorkerRole.

I opened the properties of the WebRole

Webrole_Properties

and clicked on “Add Certificate”

WebRole_Add_Certificate

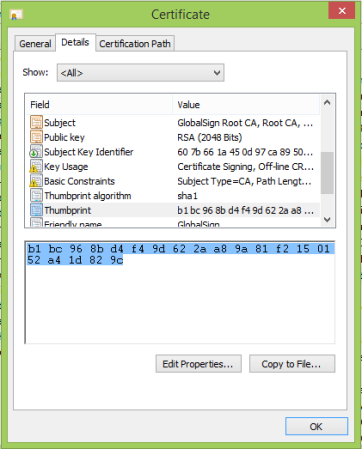
Then it´s necessary to insert the thumbprint of the certificate. Microsoft provides instructions how to get that. I take the GlobalSign Root CA certificate as example.

Certificate_Details

As described in the instructions I copied the hexadecimal value of the thumbprint and inserted it into Visual Studio.

Webrole_Properties_With_Thumbprint

That´s it. Save – Build – Build failed… Well, why isn´t it surprising me?

I got the following errormessage:

The XML specification is not valid: The ‘thumbprint’ attribute is invalid – The value ‘‎b1 bc 96 8b d4 f4 9d 62 2a a8 9a 81 f2 15 01 52 a4 1d 82 9c’ is invalid according to its datatype ‘http://schemas.microsoft.com/ServiceHosting/2008/10/ServiceConfiguration:ThumbprintType&#8217; – The Pattern constraint failed.

Invalid_Thumbprint

My first suspicion was that I eventually have to remove the blanks but that didn´t solve it. So after counting the correct amount of hexadecimal characters (40) I noticed that I had to press the right cursor button twice at the beginning of the string in order to get past the first character. 

Indeed there was an “invisible” character at the first position that caused that error. The character has the decimal value 8206 and represents a “left-to-right mark“. After removing it everything worked like a charm. 

Debug Windows Service in Visual Studio

In a lot of projects I use Windows Services to host services in Client-Server scenarios. In order to debug the service Microsoft recommends to install the service, start it and attach the Visual Studio debugger to the process.

Doing it this way you have to be aware of these things:

  • The service must be installed on your machine using installutil
  • You must stop the service each time you build your project because otherwise the .exe is locked
  • Don´t forget to uninstall the service before you change the namespace of the project or if you move/delete it. Otherwise the service instance remains installed and you have to remove the appropriate registry keys manually
  • Too many clicks for such a simple thing 🙂

You can also use frameworks like Topshelf to ease your development. But often the customer isn´t interested in getting a product that contains frameworks others than Microsoft´s and sometimes, as a developer, you don´t see the need of a separate framework.

Hence I used a simple but effective way at Tekaris to solve that problem, demonstrated by the following example project:

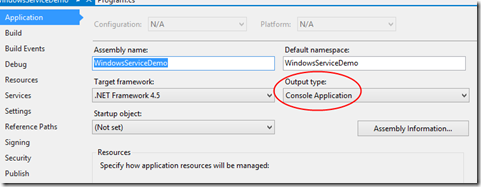
  1. Set the type of the project that contains the Windows service to “Console Application”
    consoleapp
  2. Add a public method Start to your service and move the logic of your OnStart method to it
  3. Call the Start method in the OnStart method
    public class MyWindowsService : ServiceBase
    {
        public void Start()
        {
            // Do your work here
         }
    
         protected override void OnStart(string[] args)
         {
             Start();
         }
    
         protected override void OnStop()
         {
             // Do you cleanup here
         }
     }
    
  4. Create and start the service in the Main method of the Program.cs of the Windows service project
    private static void Main(string[] args)
    {
        var service = new MyWindowsService();
    
        if (Environment.UserInteractive)
        {
            Console.WriteLine("Starting {0}...", service.GetType().Name);
            service.Start();
            Console.WriteLine("{0} is running...", service.GetType().Name);
            Console.WriteLine("Enter C to stop the service.");
    
            var input = Console.ReadLine();
            while (input != "C")
                input = Console.ReadLine();
        }
        else
            ServiceBase.Run(new ServiceBase[] {service});
    }
    

The “trick” is to check whether the application runs in an user interactive environment. That´s the case if you start your solution in Visual Studio. The public Start method is necessary because the protected OnStart method of the service is called by the framework.

if (Environment.UserInteractive)
{
    ...
}

When you install the service via the installutil command and start it via the “Local Services” snapin, the environment is not user interactive and the default behavior for starting a Windows service takes place.

ServiceBase.Run(new ServiceBase[] {service});

Encrypting large data with asymmetric RSACryptoServiceProvider

The .NET framework provides an easy way to encrypt and decrypt sensitive data using the RSACryptoServiceProvider. There are only a few steps necessary to get the encryption working via several machines:

  • Create the key container on one machine and allow to export the private key:
    aspnet_regiis -pc <KeyContainerName> -exp
  • Export the key container:
    aspnet_regiis -px <KeyContainerName> <PathToExportXML>
  • Import the key container on the other machines:
    aspnet_regiis -pi <KeyContainerName> <PathToExportXML>
  • Grant access for appropriate accounts:
    aspnet_regiis -pa <KeyContainerName> <AccountName>

Encrypting and decrypting are straight forward API-calls:

public class RSAEncryptionService
{
    private const string ProviderName = "Microsoft Strong Cryptographic Provider";
    private const int ProviderType = 1;

    protected RSACryptoServiceProvider CreateProvider()
    {
        return new RSACryptoServiceProvider(new CspParameters(ProviderType, ProviderName)
        {
            KeyContainerName = "KeyContainerName",
            Flags = CspProviderFlags.UseExistingKey |
            CspProviderFlags.UseMachineKeyStore
        });
    }

    public string Encrypt(string decryptedData)
    {
        var encryptedBytes = CreateProvider().Encrypt(Encoding.Default.GetBytes(decryptedData), true);
        return Encoding.Default.GetString(encryptedBytes);
    }

    public string Decrypt(string encryptedData)
    {
       var decryptedBytes = CreateProvider().Decrypt(Encoding.Default.GetBytes(encryptedData), true);
       return Encoding.Default.GetString(decryptedBytes);
    }
}

So as you see with these steps you can set up an application server environment that ensures, that your applications encryption logic is working on every machine.

But what´s the problem when you run into a “Bad Length” CryptographicException? I got such an exception lately at Tekaris in a customer project. You won´t face this problem if you only encrypt “small” data like passwords with a widely seen length of 8-16 characters. You face it when you try to encrypt a string with more than 87 characters. The reason is that RSA can only encrypt data blocks that are shorter than the key length. One the one hand you could switch over to symmetric encryption but sometimes it´s not what you intentionally wanted. On the other hand you can stay with asymmetric encryption and adjust the above code example:

public class RSAEncryptionService
{
    private const string ProviderName = "Microsoft Strong Cryptographic Provider";
    private const int ProviderType = 1;
    private const int SegmentLength = 85;
    private const int EncryptedLength = 128;

    protected RSACryptoServiceProvider CreateProvider()
    {
        return new RSACryptoServiceProvider(new CspParameters(ProviderType, ProviderName)
                                                {
                                                    KeyContainerName = "KeyContainerName",
                                                    Flags = CspProviderFlags.UseExistingKey |
                                                            CspProviderFlags.UseMachineKeyStore
                                                });
    }

    public string Encrypt(string decryptedData)
    {
        var length = decryptedData.Length/SegmentLength + 1;
        var sb = new StringBuilder();

        for (var i = 0; i < length; i++)
        {
            int lengthToCopy;
            if (i == length - 1 || decryptedData.Length < SegmentLength)
                lengthToCopy = decryptedData.Length - (i*SegmentLength);
            else
                lengthToCopy = SegmentLength;

            var segment = decryptedData.Substring(i*SegmentLength, lengthToCopy);
            sb.Append(Encrypt(CreateProvider(), segment));
        }

        return sb.ToString();
    }

    public string Decrypt(string encryptedData)
    {
        var length = encryptedData.Length/EncryptedLength;
        var sb = new StringBuilder();

        for (var i = 0; i < length; i++)
        {
            var segment = encryptedData.Substring(i*EncryptedLength, EncryptedLength);
            sb.Append(Decrypt(CreateProvider(), segment));
        }

        return sb.ToString();
    }

    protected string Encrypt(RSACryptoServiceProvider rsa, string decryptedData)
    {
        var encryptedBytes = rsa.Encrypt(Encoding.Default.GetBytes(decryptedData), true);
        return Encoding.Default.GetString(encryptedBytes);
    }

    protected string Decrypt(RSACryptoServiceProvider rsa, string encryptedData)
    {
        var decryptedBytes = rsa.Decrypt(Encoding.Default.GetBytes(encryptedData), true);
        return Encoding.Default.GetString(decryptedBytes);
    }
}

The solution is to split the data, encrypt the segments and join them again. Of course the performance is not as good as with symmetric encryption. But there are two things to mention:

  • Check how often you are really using this logic in your application lifecycle and hence is it really performance critical?
  • You can remain with your (eventually environment depending) decision to use asymmetric encryption

An example is to execute an operation with an impersonated account and the credentials of that account are stored in your configuration database. Do you really retrieve the password from the database every time you need to impersonate or does your configuration service internally cache the decrypted setting? Well if not, the account must be a companywide-godfather-account to need such a complex password 🙂

Parsing C# DateTime without timezone indicator to a cross-browser valid date object

In a recent project at Tekaris we had to calculate with date objects in JavaScript. The values were stored in a SQL database and delivered as C# DateTime instances via an ASP.NET Web Api Controller. No conversion to a string with custom formatting was done. The Api Controller did all that automatically.

The client received the DateTime object from the REST interface in the format “yyyy-MM-ddTHH:mm:ss.fff“

Example: 2014-03-14T12:33:17.948

For “typesafe” processing we created Date objects by calling the constructor of JavaScript Date.

Example:

Server

    public class BookingModel
    {
        public string Name { get; set; }
        public DateTime BookingDate { get; set; }
    }

    [RoutePrefix("api")]
    public class ValueController : ApiController
    {
        [Route("booking/")]
        [HttpGet]
        public BookingModel Get()
        {
            return new BookingModel
            {
                Name = "Test", 
                BookingDate = new DateTime(2014, 3, 10, 15, 30, 22, 219)
            };
        }
    }

Client

<div>
    <script type="text/javascript">
        function onClickHandler() {
            $.ajax({
                url: 'http://localhost:28145/api/booking',
                data: '',
                success: onSuccess,
                dataType: 'json'
            });
        }

        function onSuccess(data, textStatus, jqXHR) {
            var date = new Date(data.bookingDate);
            alert('Text: ' + data.bookingDate + '\nObject:' + date);
        }
    </script>
    <button onclick="onClickHandler();">Get datetime</button>
</div>

Everything was fine with Firefox and Internet Explorer 11 but Google Chromes JS engine created a different Date object with (in our case/timezone) one hour in the future. The problem is that the datetime string has no timezone indication and in that case Chrome interprets the given time as a UTC time and Firefox interprets it as a local time.

The following example shows you how to handle that on client side if you have no influence on the way and format the data is provided to you.

function onSuccess(data, textStatus, jqXHR) {
	var date = new Date(parseDate(data.bookingDate));
	alert('Text: ' + data.bookingDate + '\nObject:' + date);
}

function parseDate(value) {
	if (/\d{4}-[01]\d-[0-3]\dT[0-2]\d:[0-5]\d:[0-5]\d(\.\d+)*/.test(value)) {

		var dateSegments = value.substring(0, value.indexOf('T')).split('-');
		var timeSegments = value.substring(value.indexOf('T') + 1).split(':');

		var seconds = timeSegments[2];

		var milliseconds = '0';
		if (seconds.indexOf('.') > 0) {
			var segments = seconds.split('.');
			seconds = segments[0];
			milliseconds = segments[1];
		}

		var result = new Date(parseInt(dateSegments[0]),
							  parseInt(dateSegments[1]) - 1,
							  parseInt(dateSegments[2]),
							  parseInt(timeSegments[0]),
							  parseInt(timeSegments[1]),
							  parseInt(seconds),
							  parseInt(milliseconds));
		return result;
	}

	return new Date(value);
}

The function parseDate takes the string and if it´s in the described format (with or without milliseconds) and splits it into the components year, month, day, hours, minutes, seconds and milliseconds. That allows you to call the Date constructor that takes these values and you will get the same date object on different browsers.

If you can change the server logic you can set the format of the JsonFormatter to add timezone information:

Example:

GlobalConfiguration.Configuration.Formatters.JsonFormatter.SerializerSettings.DateFormatString = "yyyy-MM-ddTHH:mm:ss.fffZ";

You can find the custom format strings on MSDN

http://msdn.microsoft.com/en-us/library/8kb3ddd4.aspx